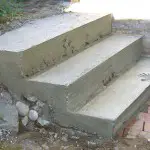
If you are planning to build concrete steps on the exterior of your house, you need to check local laws and conform to the same but for internal steps feel free to make them the way you like. This project involves building of forms, mixing the concrete ingredients in correct proportions (you could use pre-packaged mix), pouring concrete and the process of curing. You should also keep in mind the material you intend using for handrails.
Here are the tools and materials needed for the project:
- Hand tools, rakes, shovels, brooms
- Level, ruler, hammer, saw, tape ruler, saw, hammer, nails
- Wheelbarrow or portable concrete mixer, mixer trowels
- Premixed concrete or
- Concrete ingredients: Portland cement, sand, aggregate, water
- Plywood, lumber for forms and stakes
- Some grease or oil
STEP 1 – Stair Design – Calculate the size of the concrete steps
The first step to building concrete steps is to calculate the floor to floor height and the length of the stairway. Exterior concrete steps are most comfortable with a 12″ tread and a riser height of 7.5”
1) Height of one floor to the other = the total rise to the stairs
2) Measure the horizontal distance the staircase will span
3) Measure the width of each step from left to right in the area where the staircase will go
4) Divide the elevation by 7.5 to see how many steps you’ll need. This height is typical for step risers. To get an even figure, you may have to go a little above or below 7.5” Make sure that the height of each step (riser) and its depth (tread) remains unchanged. A step that is going to serve as a landing should be at least 3 feet deep.
5) To calculate the total run of the stairs, when you use the top landing as the last tread there will be one less tread than risers. It means a 3 riser set of concrete steps will have 2 treads. Multiply the tread length (12”) by the number of treads and you get the total run.
STEP 2 – Site Preparation
Having determined the number of steps, you’ll need to prepare ground for holding concrete. The purpose is to get a levelled, tough surface. There should be no rubble around it. You won’t like having steps which sink or are disconnected from the house.
1) Get rid of all grass, roots, debris.
2) Go beneath the surface by about 6” and compact the earth thoroughly.
3) Next, using sand or gravel, get about four to five inches of plane to work with.
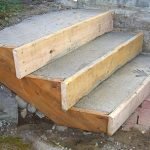
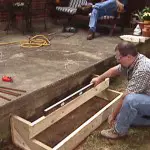
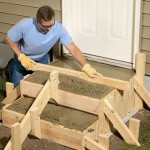
STEP 3 – Building step forms
Forms can be made from plywood and usually scrap or low-grade lumber is used for the purpose.
1) Layout and cut the side forms as per the tread and riser calculations.
2) Fasten the forms firmly and tightly to the foundation of building so that the new stairs can bond well to the foundation wall in a seamless connection.
3) Use wooden stakes as bracing to defend against the outward push of poured concrete. These should be nailed every 12 inches along the outer surface of the form.
4) Install the boards that will shape the face of the risers; their width should be the same as the height of the riser. Bracing may be added at the centre if necessary. Use a level to ensure that the forms are plumb and the surface of the treads are level from side to side.
5) Coat the form with oil/grease to get it released easily from the poured concrete.
STEP 4 – Mixing concrete:
When the volume of concrete required for building concrete steps is small, you can mix it by hand. You may buy pre-mixed, ready-to-use concrete to which you just need to add water. Otherwise, you may procure all the items and mix them in the correct proportion. If you add more water, you’ll get a fluid, workable mix but less water results to having a stronger concrete. The thumb rule for adding water is to use 6 gallons of water per bag of cement.
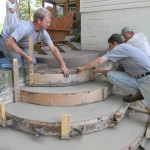
STEP 5 – Pouring the concrete:
1) Start pouring from the bottom step and pour one step at a time. Having poured concrete it should be evenly spread throughout the form. Keep hammering the exterior of form from time to time to eliminate any air bubbles.
2) Care should be taken to ensure that corners of the form are also filled with concrete.
3) After the form is completely filled up use a board and move it backwards and forwards over the top of the concrete to get a smooth concrete surface on top.
STEP 6 – Giving the finishing touches:
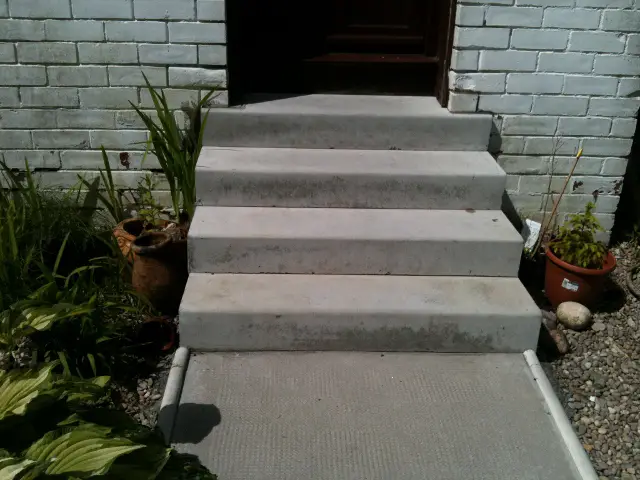
There are many ways of getting a smooth surface while building concrete steps. A good finish is needed to get good looking stairs. A wooden float may be employed to get an even, level surface. Hand-trowelling provides a finer finish. You can get a skid free surface by using a broom over the surface after trowelling. The concrete should remain wet or damp for up to a week after pouring. If required, suitable arrangement should be made to protect it from rain during the initial curing process. After this time the concrete has attained its final set and the form boards can be removed.
Watch thevideo below on building concrete steps.
So, now you know that building concrete steps is not all that difficult if you proceed in a planned manner as detailed up. Any well thought of plan saves time and labor and is sure to give expected results without causing any irritation.