Exposed aggregate is gorgeous and decorative that makes it a popular choice nowadays. Homeowners considering replacing their present patio or including patio in their home get a very good option of making a surface-seeding kind of exposed aggregate. This is the best option when the home lacks an arrangement for draining out chemically treated exposed aggregate. It minimizes the exposure to toxic chemicals. Construction of an exposed aggregate concrete patio takes at least one day of hard work with two to four laborers, depending on the size.
Items you’ll need
- 2 X 4s for laying forms, with extra lengths for smoothing concrete
- Rubber gloves and boots
- Old disposable clothing
- Adequate quantity of aggregate as per specification of supplier
- Concrete mixer (optional)
- Shovels, trowels, and floats for handling concrete
- Garden hose or pressure washer
- Brooms and handheld brushes with hard bristles
- Lawn rollers, drill, wheelbarrow, hammer, buckets, scrap wood, other general tools
The steps of constructiong an exposed conrete patio are described in brief below.
Step 1 – Preparation
This is the first step of exposed aggregate patio construction. It may take one to two days to complete preparatory work. It includes building concrete forms for patio with help of 2X4s and securing them firmly with poles or stakes. Get the aggregate in advance as it needs to be washed for getting it rid of sediment. A very convenient way is to drill small holes in a bucket and fill the same with aggregate and wash it up with a hose till clear water starts coming out of the bucket. The items you intend hiring, like cement mixer and lawn roller should be collected the night before stating the job. Else, reserve it with the supplier for getting picked up in the morning.
Step 2 – Pouring concrete
The process should be started early morning so that you get more breaks during the day. You may hire a concrete mixer or order premixed concrete but pour the same in batches. If you order premixed concrete ensure that it is delivered in time. Start filling the forms gradually, working from the bottom up to 1/4 inch lower from the top.
Step 3 – Spreading of aggregate
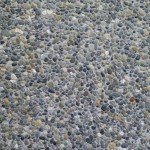
Let the concrete begin to set. Next, distribute the aggregate over the surface of concrete. Rather than pouring the aggregate, use a ‘seeding’ action to get even distribution. Lightly level the aggregate using brushes and brooms. This is the third step of exposed aggregate process.
Step 4 – Pressing aggregate
Using lawn rollers press the aggregate in concrete. It helps to keep moist the surface of roller as it won’t gather aggregate and concrete. Look for uncovered spaces and fill in more of aggregate. Rolling should be done after the aggregate is pressed beneath the top layer of concrete and surface is flushing and in level with the forms.
Step 5 – Brushing and washing
Depending on specifications of supplier and humidity level plus temperature, you’ll need to wait before brushing. Remove concrete from the surface with brooms and brushes. Once most of the aggregate becomes visible, you can start washing lightly with water. Continue the process of washing and brushing till the original color of the aggregate comes back.
Step 6 – Giving final touches
Let the concrete cure as recommended by the supplier. After the exposed aggregate patio has completely set in, you may apply a coat of sealer to enhance and retain its good looks for a long time.
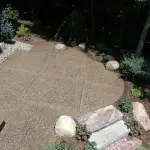
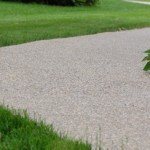
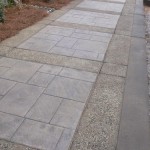
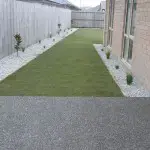
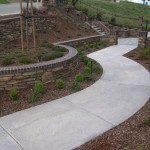
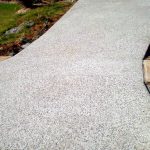
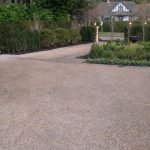
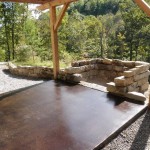
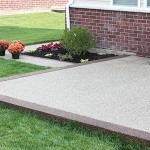
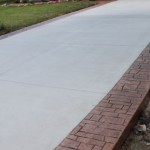
Below are some exposed aggregate patio pictures to get some idea about how it may look like.