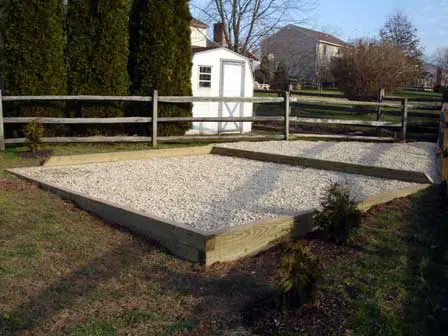
When building a shed foundation, there are two basic categories: on-grade and frost-proof. Most sheds are built using on-grade foundations as they are the simpler of the two. Frost-proof or permanent foundations are much more difficult to build and they are strong and long-lasting. On-grade foundations do not require deep digging. To build a shed foundation using the on-grade technique is relatively easy and inexpensive. These foundations are adaptable enough except for severely sloping sites. On-grade foundations can be built using various materials.

Building Different Types of Shed Foundations
There are many types of shed foundations an each type construction procedure is different from the other. Steps by step process to build a shed base is described below.
# Concrete Block Foundations
The shed sits on several solid concrete blocks.
- Remove any debris, weeds, etc from the designated area.
- Rake and level the area. The area does not have to be completely level, but does need to be semi-level to keep the shed flooring from becoming tilted. Pour a layer of gravel for the blocks to sit on. This keeps the water from pooling beneath the foundation and causing the soil to wash away.
- Measure and mark with spray paint the perimeter of the shed’s foundation on the ground where the shed will be positioned.
- Lay out the solid concrete blocks in straight, evenly spaced rows. The number of blocks and rows will vary depending on the size of the shed.
- Once the rows are in place, it will be time to place the shed’s joists and flooring.
Be sure to use only solid concrete blocks as they are more durable and stable. Hollow blocks or standard wall blocks will crack over time and begin to crumble under the weight of the shed.
# Skid Foundations
Skids have been used for years to support sheds and other outbuildings. It is a simple process that is easy for do-it-yourselfers.
- Clear the area of debris and weeds.
- Level the area and mark the foundation parameter with spray paint.
- Pour a layer of gravel within the perimeter of the foundation. Be sure to level the gravel. The gravel keeps the ground from washing away from underneath the shed or water from pooling.
- Lay at least two long timbers or skids on the ground parallel and evenly spaced.
- The shed’s floor frame is built on the skids.
Make sure the timbers are straight and similar to length. The gravel will help support the timbers and keep the moisture from rotting the timbers more quickly.
# Timber Frame Foundations
These foundations are basically wooden rectangular frames on a gravel bed.
- Clear the area of debris and weeds.
- Level the area. For this foundation, the area needs to be pretty level because the actual floor of the shed is the foundation. Using spray paint, mark the perimeter of the shed’s foundation.
- Pour a layer of gravel and level it. Make sure that the gravel has been tamped down. The gravel will keep moisture away from the underneath of the shed and minimize the rot process of the timbers.
- Build a rectangular frame in the dimensions of the shed. Place the wooden rectangle on the gravel in the position that you would like the shed.
- Once the rectangle is in place, the floor can be built up with more gravel, crushed granite, concrete, etc. The rest of the shed is then built.
A typical timber foundation frame is made of pressure treated 4x4s, 6x6s or 4x6s. The timbers are joined using half lap corner joints or long landscaping spikes or screws.
